Sorry for the lack of reviews, but school started and I've been way too busy with classes to do anything related. It's really hard for me to actually do anything nail related since I have a lab class this semester. Though we don't have any restrictions, it's kind of hard to do all the stuff I do in micro lab with nice, done-up, nails without them getting ruined in a day. So lately my nails have been naked and haven't been touched with polish since the last post (and my hands drier than ever ><).
I just wanted to update to mention what will be coming up next.
I'll actually be doing a TUTORIAL next using artificial nails. In fact, I'll be using the burgundy colored Nailene Nail Studio nails and actually touching them up with a bit of my imagination.
My sister will be getting married next month and lucky for me that these nails fit the color scheme. I've also just bought a decorating nail stand for artificial nails which I can't wait to try out. So I'll be working on them as soon as I find some free time (and get the right colors =X). Until then!
Tuesday, September 21, 2010
Saturday, September 4, 2010
Review: Nailene Bedazzle Nail Art


What I loved about these decals is that they were easy to peel off the backing, yet were strong enough to stick to my nails without sliding around or ripping off. Previous stickers I'd use would actually slide off my nails without me knowing, so when I'd look at them I'd see the outline of where they were or have lint stick to where it used to be haha.
What I didn't like was when you're removing your polish, the decals don't come off with it. Now when I said these were strong enough to stick to my nails without falling off, i mean it. These suckers held on for dear life.


As you can see, I have NO polish on what-so-ever, yet these things stuck on without even a scratch on them. I mean, it was cool that I was able to keep them on just for a bit longer even after my polish chipped, but I was ready to get them off, and they just wouldn't come off.
They eventually started coming off a week later, but I'm not sure if it fell off because of the amphyl I used during biology lab or if they fell off on their own. Either way, they fell off basically and you can definitely tell where they were on my nails because of the left over polish behind it.
I really liked these decals/stickers because they were strong enough to stay on my nails and have these great designs. I just wish they were soluble in acetone.
Wednesday, August 25, 2010
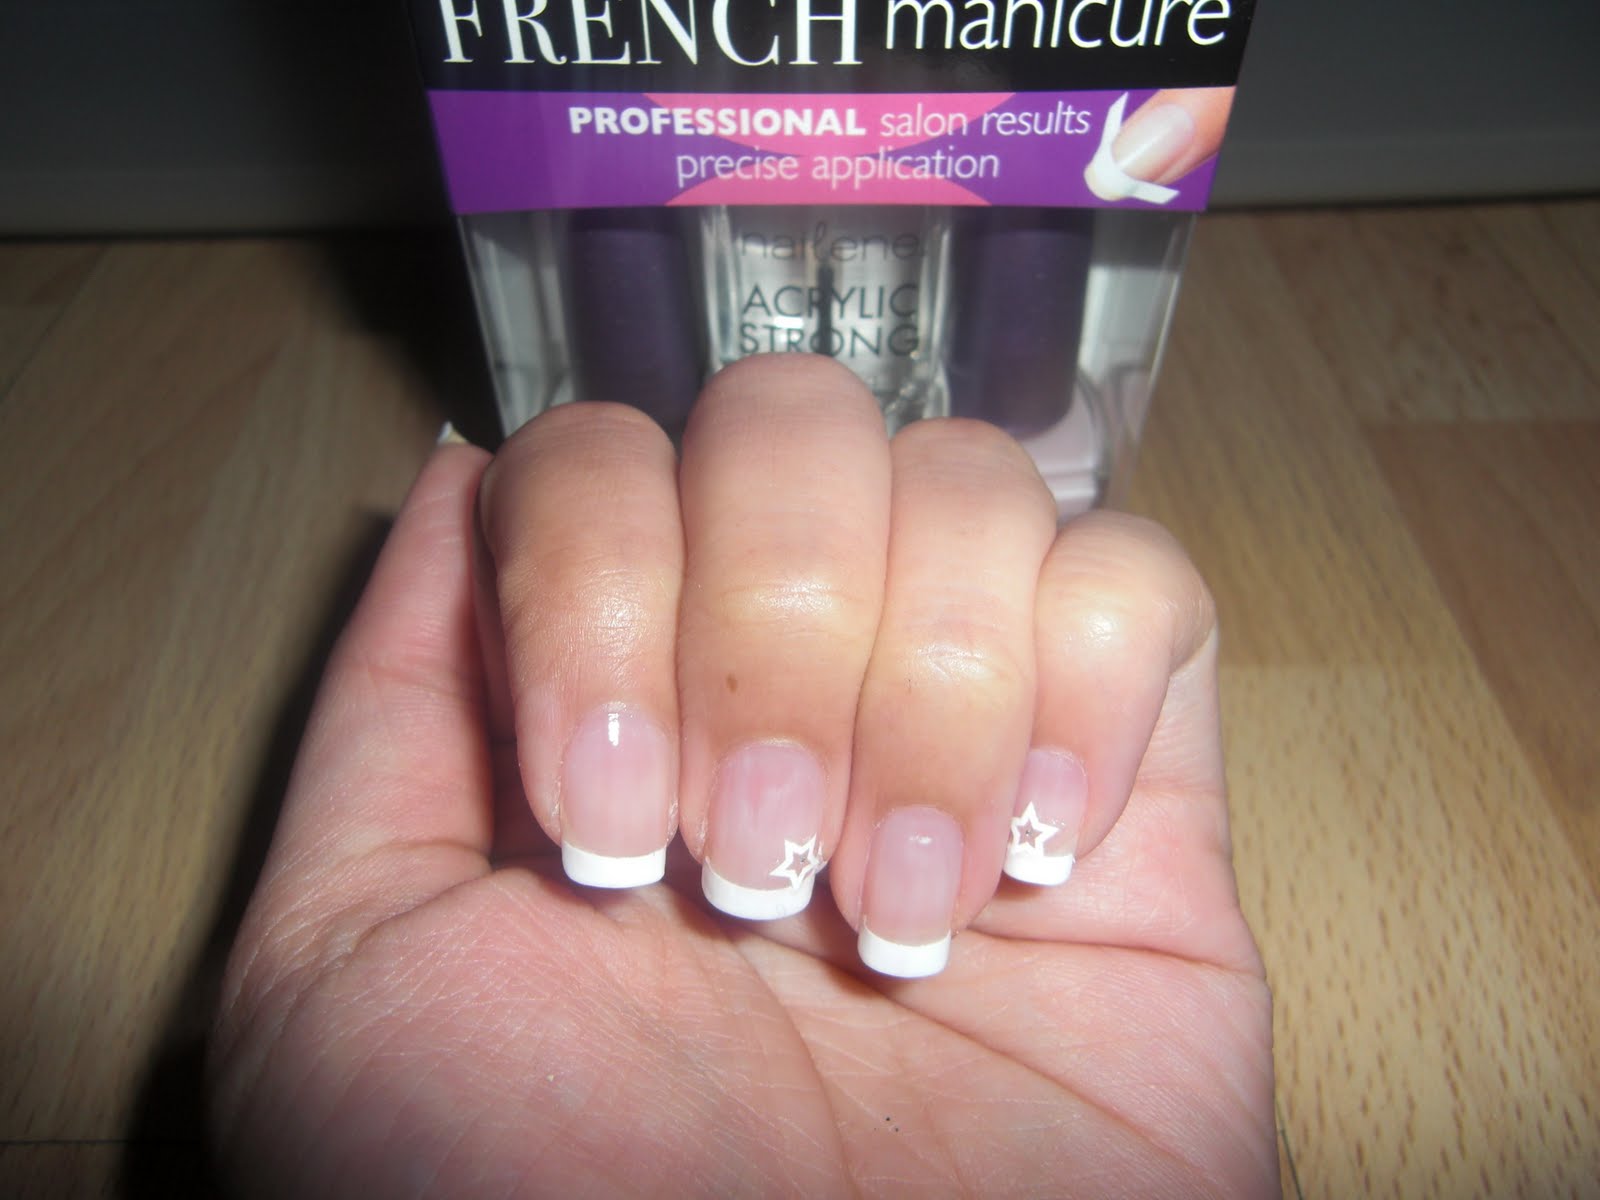
Review: Nailene French Manicure kit
The first Nailene (http://www.nailene.com) product that I used from the prizes that I won was the Nailene French Manicure kit. I was so excited to use this product first because I'm a huge fan of french manicure style nails. This is typically the only way I do my nails so getting this was like a dream (haha).


Starting off with clean, groomed nails, I added the nail guides provided in the kit. Typically I don't use the nail guides and just free-hand the tips because of past experiences using the guides from the Sally Hansen French Manicure kits, which I hated.


Unlike the Sally Hansen guides, which never gave me a clean line even after minutes of drying (it always bled through the guide), the Nailene guides gave me a SUPER clean nail tip which I couldn't believe. It seriously looked like my tips were fake.
For the polish, I wasn't a big fan of the brush in the white polish. I'm not sure if it was just me painting it on really badly, or the brush itself. But I found myself struggling to use it or to keep dipping it back into the polish.
What I did like was the base color that came with the kit. I was a bit scared to use it since the bottle looked really pink, but when I brushed it on, it came out with a nice opaque color that did not over power on my nails.
The acrylic top coat that came in the kit was the best part. None of the top coats I've used had a lasting effect on my nails. They'd either start chipping off the polish in HUGE chunks within a day or two. With this top coat, It actually made the polish last at least a week with little or no wear.
Even with the constant rustling through my purse and luggage during vacation, I was still able to maintain this look without any great damage.


Adding a touch of the nail art stickers (which I will review next), I've created a look that I was very satisfied and happy with. I'd definitely recommend the Nailene French Manicure kit to anyone who's looking for a quick and easy (and inexpensive) French manicure that you can do in the privacy of your own house.


Starting off with clean, groomed nails, I added the nail guides provided in the kit. Typically I don't use the nail guides and just free-hand the tips because of past experiences using the guides from the Sally Hansen French Manicure kits, which I hated.


Unlike the Sally Hansen guides, which never gave me a clean line even after minutes of drying (it always bled through the guide), the Nailene guides gave me a SUPER clean nail tip which I couldn't believe. It seriously looked like my tips were fake.
For the polish, I wasn't a big fan of the brush in the white polish. I'm not sure if it was just me painting it on really badly, or the brush itself. But I found myself struggling to use it or to keep dipping it back into the polish.
What I did like was the base color that came with the kit. I was a bit scared to use it since the bottle looked really pink, but when I brushed it on, it came out with a nice opaque color that did not over power on my nails.
The acrylic top coat that came in the kit was the best part. None of the top coats I've used had a lasting effect on my nails. They'd either start chipping off the polish in HUGE chunks within a day or two. With this top coat, It actually made the polish last at least a week with little or no wear.
Even with the constant rustling through my purse and luggage during vacation, I was still able to maintain this look without any great damage.

Adding a touch of the nail art stickers (which I will review next), I've created a look that I was very satisfied and happy with. I'd definitely recommend the Nailene French Manicure kit to anyone who's looking for a quick and easy (and inexpensive) French manicure that you can do in the privacy of your own house.
Sunday, August 22, 2010
Nailene Haul
My first entry in this review blog was for Nailene's (http://www.nailene.com) first giveaway. I was fortunate enough to win a prize for my review and got a great selection of prizes from Nailene.


Found in my swag bag was:
* Nailene French Manicure w/ Top Coat
* Nailene Perfect Toes
* Nailene Acrylic Fill Kit
* Nailene Perfect Tips & Toes
* Nailene Nail Studio Nails (burgundy color)
* Nailene Bedazzle Nail Art
* Nailene Nail Art Stickers (4th of July and Rhinestone stickers)
I'll definitely get around to making tutorials and reviews when I get a chance to use them.
I've already tried out the French Manicure kit which I'll be putting up a review later on this week.


You have no idea how excited I was to see the package sitting on my computer table when I got home that night. I immediately opened up the package to see the nailene bag neatly prepped inside.


* Nailene French Manicure w/ Top Coat
* Nailene Perfect Toes
* Nailene Acrylic Fill Kit
* Nailene Perfect Tips & Toes
* Nailene Nail Studio Nails (burgundy color)
* Nailene Bedazzle Nail Art
* Nailene Nail Art Stickers (4th of July and Rhinestone stickers)
I'll definitely get around to making tutorials and reviews when I get a chance to use them.
I've already tried out the French Manicure kit which I'll be putting up a review later on this week.
Friday, August 6, 2010
Review: EOS Lip Balm
I'm a huge fan of lip balm. I HAVE to have one no matter where I am.
I used to carry a stick with me at all times in my jean pocket and it's very apparent in one of a pair of my jeans leaving a faded line mark in the front right pocket (haha!).
Now, i've tried a lot of different brands like Blistex, Carmex, Chapstick, etc. Even though i'd go back to using the same kind of brand over and over again, it wasn't because it was my favorite brand and what-not, but because it was inexpensive.
I've heard great reviews about EOS (Evolution of Smooth) lip balm and how it'll keep your lips smooth for quite awhile. Just recently I jumped on the hype and bought two EOS smooth spheres in the summer fruit flavors (2 for $5 deal!).
 I felt like a kid during Christmas when I first opened it. I couldn't wait to try it (not to mention I had lost my chapstick prior to this so I REALLY needed to use it). I was quite surprised when I first tried it out. I didn't think the lip balm would be just a mound or as big, but it's so conveniently designed that it's no wonder the size was as is. What I liked was how the shape of it allows you to apply to both the upper and lower lip at the same time, which means less strokes!
I used to carry a stick with me at all times in my jean pocket and it's very apparent in one of a pair of my jeans leaving a faded line mark in the front right pocket (haha!).
Now, i've tried a lot of different brands like Blistex, Carmex, Chapstick, etc. Even though i'd go back to using the same kind of brand over and over again, it wasn't because it was my favorite brand and what-not, but because it was inexpensive.
I've heard great reviews about EOS (Evolution of Smooth) lip balm and how it'll keep your lips smooth for quite awhile. Just recently I jumped on the hype and bought two EOS smooth spheres in the summer fruit flavors (2 for $5 deal!).

The flavor of this lip balm is incredible. It has such a sweet taste to it, yet it's not as if you have sugar on your lips. Now, I constantly apply lip balm on my lips, only because I end up wiping it off in some way or another, but I was amazed at how well this has kept up. I've been working on the same one for almost a month now and I'm just about half way done now. Usually for a regular stick, i'd be about 3/4 of the way down.
Overall, I really enjoy this lip balm and would love to be able to continue using it in the long run. There's still 3 other flavors to try out, which I'll do a review on when I get to that chance. In the meantime, I totally recommend this lip balm for those who don't mind carrying it around since it's a bit bulkier than a stick. Not recommended for guys, but will suggest to try the stick form of EOS' lip balm.

Tuesday, July 27, 2010
Nailene
I've tried Nailene (http://www.nailene.com) a couple times and I must say, their products are amazing! My favorite product that i've tried so far are the Nailene So Real full cover nails. I had just gotten done with science labs for the semester so my nails were short. I wanted to start doing nail art again, but not on my short nails, so I got the Nailene So Real nails because I've heard great reviews. They weren't wrong.
These nails were so light that it really didn't feel like they weren't my own, not to mention how they actually contured to my nail bed naturally.
Now here's why I love them so much, they lasted for a good amount of time and usually that never happens. Without any breaks or chipping, they lasted about 3-4 weeks long. Now here's the best part, I've actually gone bowling with these things on my nails and not once did they break or chip! Anytime i've gone bowling, I always end up chipping my natural nails, but these definitely held up.
 For the look that I have in this picture, I just added on some glitter polish just to change it up after the 2nd week.
I recommend the full coverage nails for those who want that nail salon manicure look without spending an arm and a leg for, and it only takes a couple minutes to do yourself. Check out what Nailene has to offer, you won't regret it!
These nails were so light that it really didn't feel like they weren't my own, not to mention how they actually contured to my nail bed naturally.
Now here's why I love them so much, they lasted for a good amount of time and usually that never happens. Without any breaks or chipping, they lasted about 3-4 weeks long. Now here's the best part, I've actually gone bowling with these things on my nails and not once did they break or chip! Anytime i've gone bowling, I always end up chipping my natural nails, but these definitely held up.

I recommend the full coverage nails for those who want that nail salon manicure look without spending an arm and a leg for, and it only takes a couple minutes to do yourself. Check out what Nailene has to offer, you won't regret it!
Tuesday, July 20, 2010
Purpose
Hey everyone,
I decided to make a blog where I'll be able to post product reviews and also some tutorials. I've been wanting to do this for a long time, but never found the time to do so.
The purpose of me making this blog is to share my experiences with certain products. I know there are so many beauty blogs out there, but when you get the perspective from so many different people out there, the more you can learn because everyone's characteristics are different. It's all in good fun and I hope you enjoy!
Subscribe to:
Posts (Atom)