So after the Sakura (Cherry Blossom) nails, I was getting tired of them so I removed them once it hit one week. I guess my habit of doing NOTW really got to the point where I HAVE to change them every week. Definitely not always a good choice to, gotta let them breathe every once in awhile, which means I didn't do anything to my nails this week. Not JUST because I should let them go bare, but I don't have any new colors at the moment that inspire me to make a new design, plus I'm stressing over upcoming finals.
Speaking of finals, I won't be posting (not that I post often anyways =/) until after finals, so if I do do any NOTW, i'll update with them after mid-May. I also just ordered a new hair straightener which I'll review after May, plus it'll give me a time to actually try it out.
Also, hopefully by then I'll have some new polishes to give me inspiration, especially my A's color ones!
By the way, I've been watching a lot of Japanese dramas lately, more than I should be, and I feel like I can do some great NOTW inspired nails for many of the dramas I've seen. We'll see what happens. So until mid-May~
Tuesday, April 26, 2011
e.l.f. - Nourishing Cuticle Pen Review
I bought this about 3 weeks ago (notice the nails from April 3), but have started using this for a week now.
Whenever I shop at Target, I always head to the beauty section first just to get my "wants" out of the way first before "needs" just so I can stop myself from buying something unnecessary since I'm heading to the store with the intention to buy what's on my list. Though that doesn't stop me all the time from buying something, especially if it's inexpensive ;)
I've never bought anything from e.l.f. before, though I always frequent the site to see what I would like to pick up someday (but not everything on the site ends up in stores =X). So going through a quick search of the section, I immediately pulled the cuticle pen off the display hook and placed it into my basket without even looking at the information and I only did that because I've been needing something for my dry cuticles and thought why not since it's only $1.
When I first opened it I was surprised to see that the tip wasn't a brush, but actually a felt-like tip. Pretty much like a marker. I was a bit disappointed when I first took a look at it and thought that because the tip was hard, that it had dried up or something. Turns out I was completely wrong. Although It doesn't look like it, it's actually moist and really does moisturize dry cuticles and your nails as well.
The formula for the cuticle pen have many nourishing components that are healthy for you such as avocado and almond oils. There's also a ton of different vitamins mixed in with aloe as well.
It's also not messy. It really is just like a marker, you won't have the moisturizer leak out or anything (no squeezing necessary)
The pen is REALLY lightweight and small enough to drop in a makeup case or in your purse for on the go, so you can use it whenever you need it. For what it's worth, it's definitely something I'm glad I've purchased.
[btw, they're also great use for gross, dry feet ;)]


LABEL:
Nourishing Cuticle Pen
- Relieves dry nails and flakey cuticles. The unique pen delivery system moisturizes cuticles effectively and the quick dry formula allows for a no mess application.
- Fortified with vitamins E, A, C, Pro-Vitamin B5 and Aloe, this fast-acting complex deeply hydrates, nourishes and seals in moisture. The result is softer, easy to manage cuticles and healthy hydrated nails.
Monday, April 18, 2011
NOTW: 2011-04-13
Nail of the Week
April 13, 2011
(I know the dates aren't showing up literally weekly, but I use the date when I either do them or when I upload the pictures from my camera)
It's the time for Cherry Blossoms to bloom and what's a great way to celebrate but to do some nail art of cherry blossoms~ (and YES my NOTW have actually caught up!)
- N.Y.C In a New York Minute Quick Dry Nail Polish - 234 Wall Street
- Milani Nail Art (with precision brush) in Black Sketch and White Canvas
- Toothpicks


April 13, 2011
(I know the dates aren't showing up literally weekly, but I use the date when I either do them or when I upload the pictures from my camera)
It's the time for Cherry Blossoms to bloom and what's a great way to celebrate but to do some nail art of cherry blossoms~ (and YES my NOTW have actually caught up!)
What I used:
- N.Y.C In a New York Minute Quick Dry Nail Polish - 212 Mulberry Street- N.Y.C In a New York Minute Quick Dry Nail Polish - 234 Wall Street
- Milani Nail Art (with precision brush) in Black Sketch and White Canvas
- Toothpicks

(Left: Wall Street (pink), Right: Mulberry Street (nude/tan))
I just bought these from Target last week (literally last week lol) just to be able to do these nails. I wanted some inexpensive nail polish since I'm not a big fan of pink and went straight for NYC. I was looking through the 99cent polishes but couldn't find a nice pink color. I noticed that NYC had a new collection of quick drying polishes for about $1.99 and decided to give it a go. I'm not particularly fond in using NYC since they do only last about a day or two and then begin to chip, but I was pleasantly surprised at how nice these were.
Let's start with Mulberry Street. The color is this shiny, nude, almost tan color which I was drawn to when I was looking through the collection. The color comes out way nicer than the bottle appears. One coat wasn't enough to cover the entire nail completely but a 2nd coat did the job, but I applied a 3rd coat for maximum color. The only problem was that because I used 3 coats, it took longer than a minute to dry, but they do dry quick. I absolutely love this color and am certainly going to use this often as a base color for some of the art, but also as just a put on and go polish when I don't feel like doing anything special.
Wall Street is a nice pink shade, but I would never use it as a full nail color, probably not even for the tips either. Like I said, I'm not a big fan of pink, but I wouldn't mind wearing it as long as it was the right shade of pink for my liking. I'm not particular of this shade, but wouldnt mind using it for flowers or accents. I used this pink as the petals for cherry blossoms and it took more than one dot to apply to get the color to show. If I were to apply these to my natural nail, they probably would be barely visible so it's a good thing I had a base color for it to show. Definitely not going to use this color aside from small details.


So how I did my nails was apply the Mulberry Street color as the base, allowed it to dry and drew random lines for branches across all my nails. Using the toothpick I dotted the Wall Street pink color into a box shape with 4 dots. I wanted to make them with 5 dots and wing them out to make actual cherry blossoms, but the dots came out bigger than expected so I just kept them as is. Once adding the flowers, I added some random white dots all over the nail.
I was very happy to show these off at the SF Cherry Blossom festival and yes I'm still rocking these nails today. I've had these on for about 5 days now and the polish is still holding up. I'm very surprised and am considering buying some more NYC In a New York Minute polishes when I get a chance to. On their website they have this very pretty turquoise color that I want a get a chance to see in person, and also a red and white.
Note: You like how I take these pictures before I clean up the sides? Haha
NOTW: 2011-04-03
Nail of the Week
April 3, 2011
(I know the dates aren't showing up literally weekly, but I use the date when I either do them or when I upload the pictures from my camera)
Wanted some spring inspired nails and since I bought these new nail art pearls/beads specially for a spring nail, I decided to just go with it with this design. I didn't really have a game plan, but they turned out better than I expected.
What I used:
- China Glaze 867 Re-fresh Mint
- Nailene French Manicure
- "Nail Accessory" Pearls from Daiso Japan
Used Re-fresh mint on the thumb and ring finger and painted the rest o them white. Instead of doing a french tip inspired manicure, I did a moon mani inspired nail set instead.
After the nails had dried, I took a clear polish and painted it only over the moon parts of the nail and started adding pearls in the moon shape. The thumb and ring nails are in a traditional moon while the others are actually tilted a couple degrees. I used 4 different colors: yellow on the green nails (of course), blue, green and pink.


I was satisfied with the way they turned out, but I didn't like them enough to keep them more than a week.
When I saw these in Daiso, I just had to get them (along with another nail art kit which I'll show some other time). Having the ability to buy inexpensive nail art just made me jump to get them without hesitation. I spent a good chunk of time in that section of the store trying to decide what I should get. They were only a $1.50 and the quality is pretty awesome. A couple of them fell off after being snagged in my hair (my hair ate them) when I was showering but that was the only problem I had with them which wasn't the pearls fault, it was mainly the top coat I used to secure them.
Daiso has really great inexpensive stuff. It's a great "dollar" store to buy pretty much anything you want and I certainly tend to buy something everytime I leave the store and the beauty stuff is a great steal (I just recently bought false eyelashes which I'll review when I get to try them).
NOTW: 2011-03-26
Nail of the Week
March 26, 2011
(I know the dates aren't showing up literally weekly, but I use the date when I either do them or when I upload the pictures from my camera)
*Note: I skipped nail art on March 18 to let my nails breathe a bit
These nails were inspired for my favorite baseball team, the Oakland Athletics. The new season was starting so I decided to add to my A's gear by incorporating my nails as well.
- Milani Nail Art (with precision brush) in Yellow Design
- Milani Nail Art (with precision brush) in Green Sketch


March 26, 2011
(I know the dates aren't showing up literally weekly, but I use the date when I either do them or when I upload the pictures from my camera)
*Note: I skipped nail art on March 18 to let my nails breathe a bit
These nails were inspired for my favorite baseball team, the Oakland Athletics. The new season was starting so I decided to add to my A's gear by incorporating my nails as well.
What I used:
- Milani Nail Art (with precision brush) in Art of Gold- Milani Nail Art (with precision brush) in Yellow Design
- Milani Nail Art (with precision brush) in Green Sketch
- Nailene French Manicure (base color polish and acrylic strong top coat)
I was happy to get a chance to use the Yellow and Green polishes that I had got from Target in February. Once it hit the week of opening day games, I decided to paint my nails. Because the green is pale in comparison to the teams actual green color, I decided against doing what I originally planned which I'll leave as a surprise until I get the actual color I want. I was a little hesitant to use the yellow at first, but the yellow color is actually really close to the new yellow (or gold) color jerseys the A's are wearing this season.
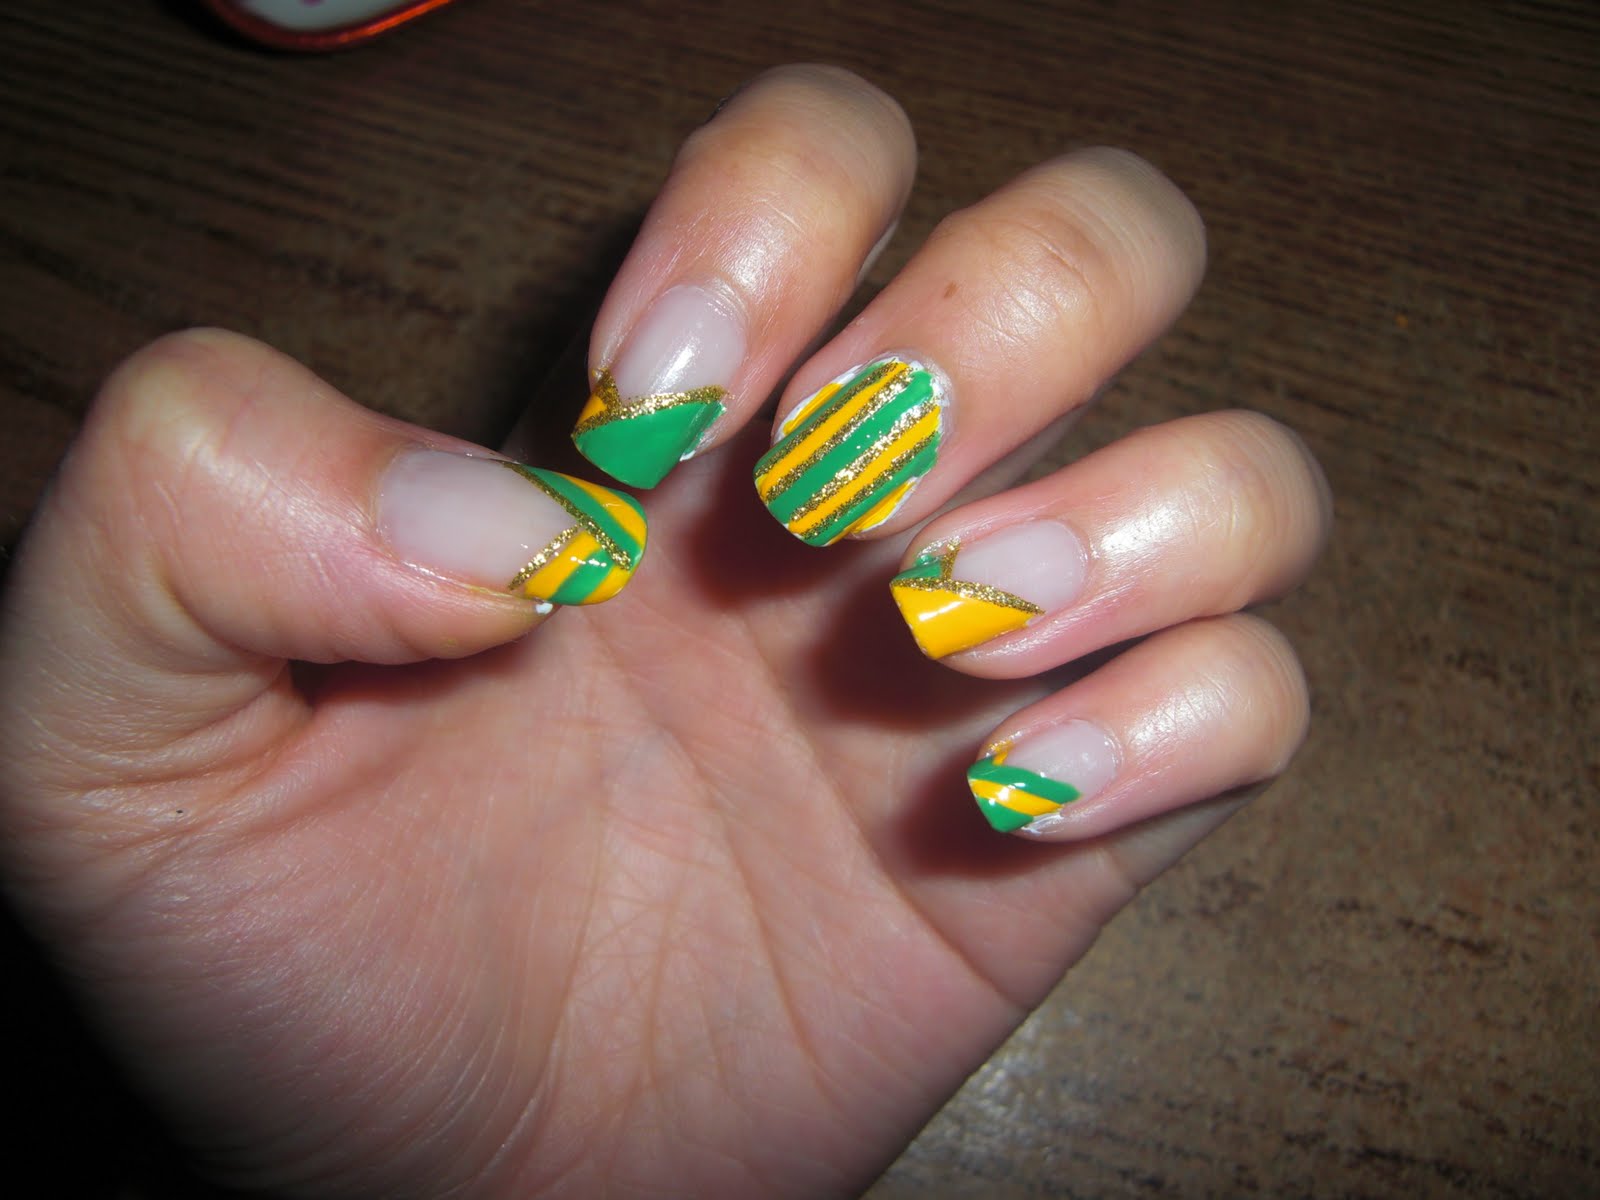

Okay, let's get down to it. I painted my thumb first just to test out the colors and I loved the way it looked, until I stared at it too long and realized what it reminded me of:

It reminded me of a volleyball
Yeah I know, what?! But really, it reminded me of a volleyball, but decided to keep going and painted the rest of my nails. When I was done I wasn't as happy with it as I should have been and removed it a day later. They didn't even get to be showcased during the Giants vs. A's exhibition. I couldn't stand looking at them and not because it reminded me of a volleyball, I just didn't like the way it looked and it's mainly because of the green color.
The Milani yellow and green stripers were a great addition to my collection, I just wish that the green was darker. The green will have great use for the spring and summer when I start designing flower art, we'll see how I'll be able to incorporate these colors in the future.
NOTW: 2011-03-11
Nail of the Week
March 11, 2011
(I know the dates aren't showing up literally weekly, but I use the date when I either do them or when I upload the pictures from my camera)
Wanted to use the same colors as last week's style. Since I wasn't completely satisfied the week before, I thought I'd do something I knew I'd be happy with which are stripes.
What I used:
- China Glaze 867 Re-fresh Mint
- China Glaze 550 Aqua Baby
- Milani Nail Art (with precision brush) in Art of Silver- Nailene French Manicure
- Toothpicks
It used the same materials as the last NOTW, but this time I painted the pointer and ring nails white. I decided to do stripes this time. so I painted diagonal lines starting with the green and then used the blue since it could overlap the green color without having it look as if i painted over the color (does that make sense?). I used the silver striper to define the lines better, then took a toothpick and dotted diagonally on the white parts of the nail.


This nail design, along with the black and white nails from December 18, are probably my favorite. I wanted to keep these nails longer than a week, but the white started to chip, so I decided to just remove them. It was actually a great idea to do that too since the blue color is actually dark enough to actually stain your nails. My nails had a hint of blue after removal. It wasn't stained for too long, but it was enough to stain them which I'm not particularly familiar with since I usually use light colors (which is strange considering the black I use doesn't stain)
*Note to self: I really need to start making names for my nail sets
NOTW: 2011-03-03
Nail of the Week
March 3, 2011
(I know the dates aren't showing up literally weekly, but I use the date when I either do them or when I upload the pictures from my camera)
*Note: I skipped nail art on February 24.
I did these nails before my sister's birthday dinner. No real inspiration, just thought I'd have fun with it since I really wanted to use these colors.
What I used:
- China Glaze 867 Re-fresh Mint
- China Glaze 550 Aqua Baby
- Milani Nail Art (with precision brush) in Art of Silver- Nailene French Manicure
- Toothpicks
After doing the basics of a base coat and base color, i painted my middle nail completely white. It took about 3 or 4 coats to get it completely white and because There were many layers, it became a pain for it to dry (not to self: invest in a white polish NOT meant for the tips) and since it was thick, when the surface dried, the middle was still soft.


I painted the tips asymmetrically (like always), but alternated colors. the index and ring are painted solid of either Re-Fresh Mint or Aqua Baby. The pinky and thumb are swiped one way with each of the colors. Using a toothpick, I dotted the color in a straight line on the middle nail. I used the silver striper to line the "smile line" of the tips.
I really liked these nails, but I also didn't paint them neatly so they didn't look as nice as I had hoped. I really love the combination of the 2 colors, which is probably why I was so drawn to these 2 colors in the first place when I purchased them.
Thursday, April 14, 2011
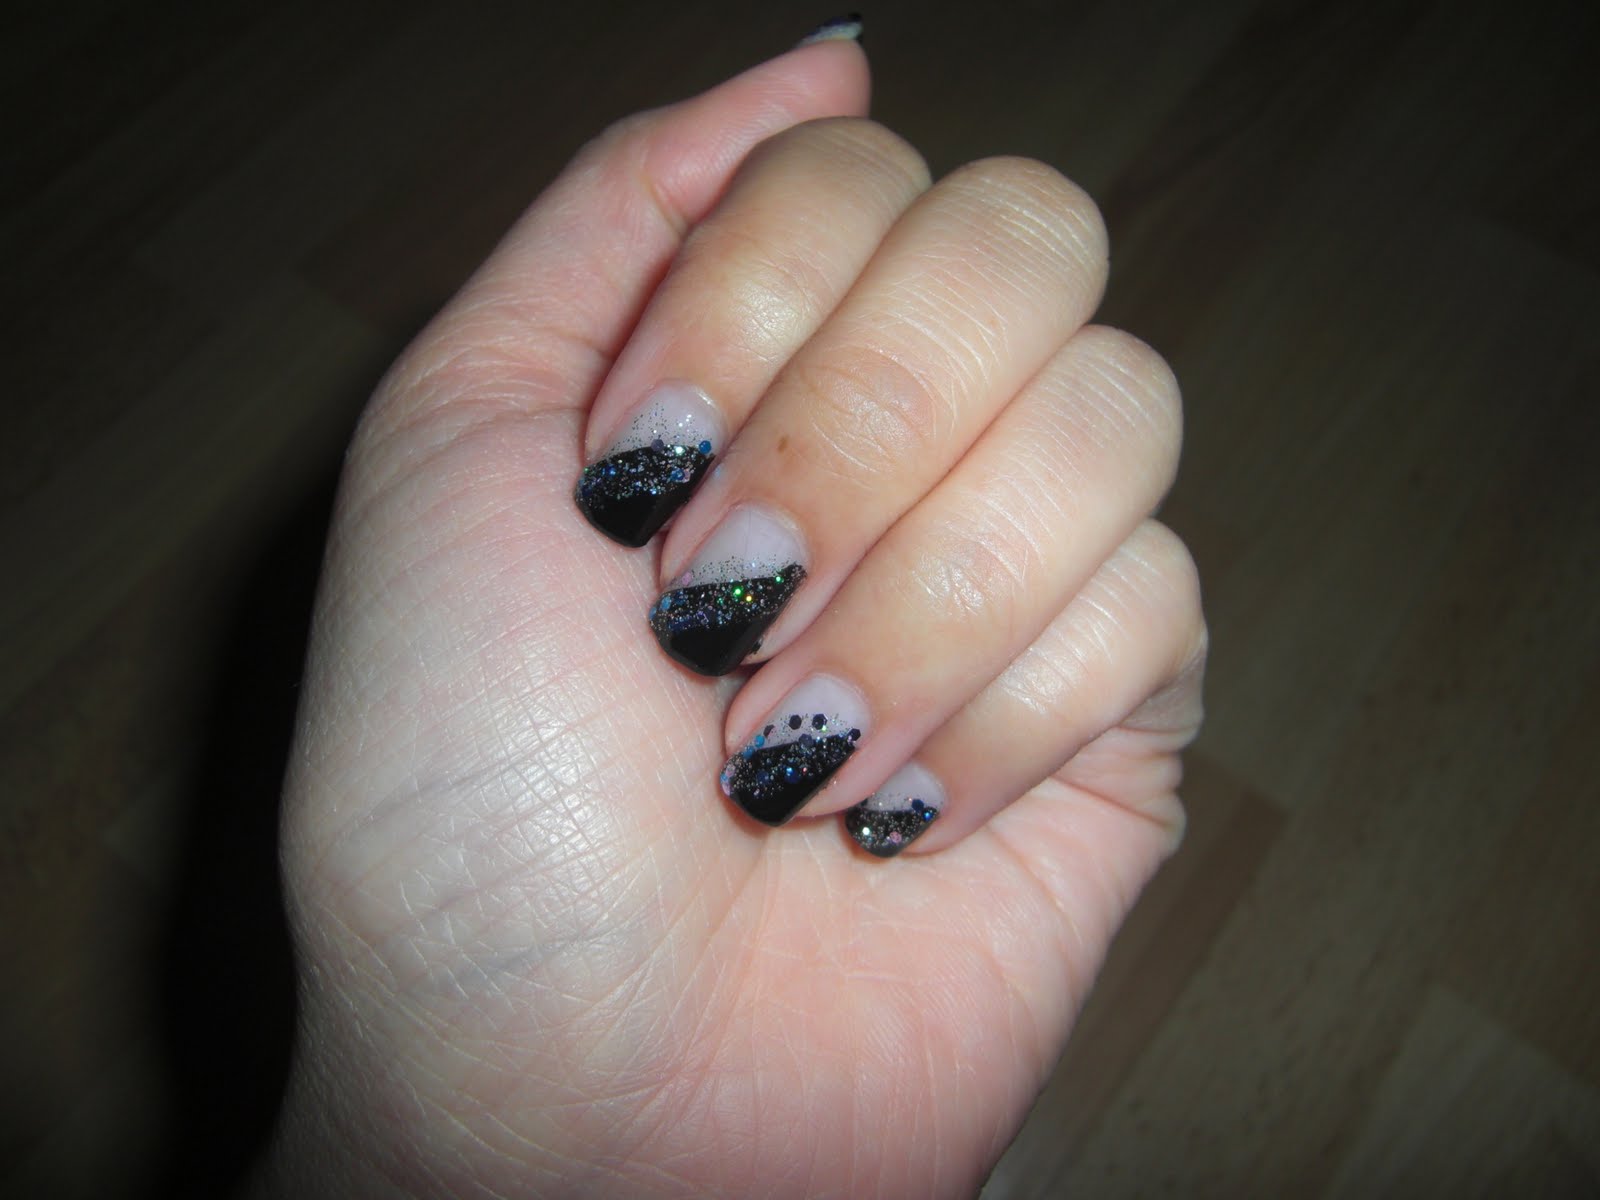
NOTW: 2011-02-12
Nail of the Week
February 12, 2011
(I know the dates aren't showing up literally weekly, but I use the date when I either do them or when I upload the pictures from my camera)
Took the mani from January 11, 2011, and instead just the tips I did diagonal tips (I should really think of a name to call these kind of tips).


I really need to buy a black polish with a regular nail brush haha, but for now this will do. I really like these nails, but not sure if I'll be doing black nails anytime soon since it's spring, but hey.. nothings wrong with having dark nails even during spring and summer, so we'll see :)
February 12, 2011
(I know the dates aren't showing up literally weekly, but I use the date when I either do them or when I upload the pictures from my camera)
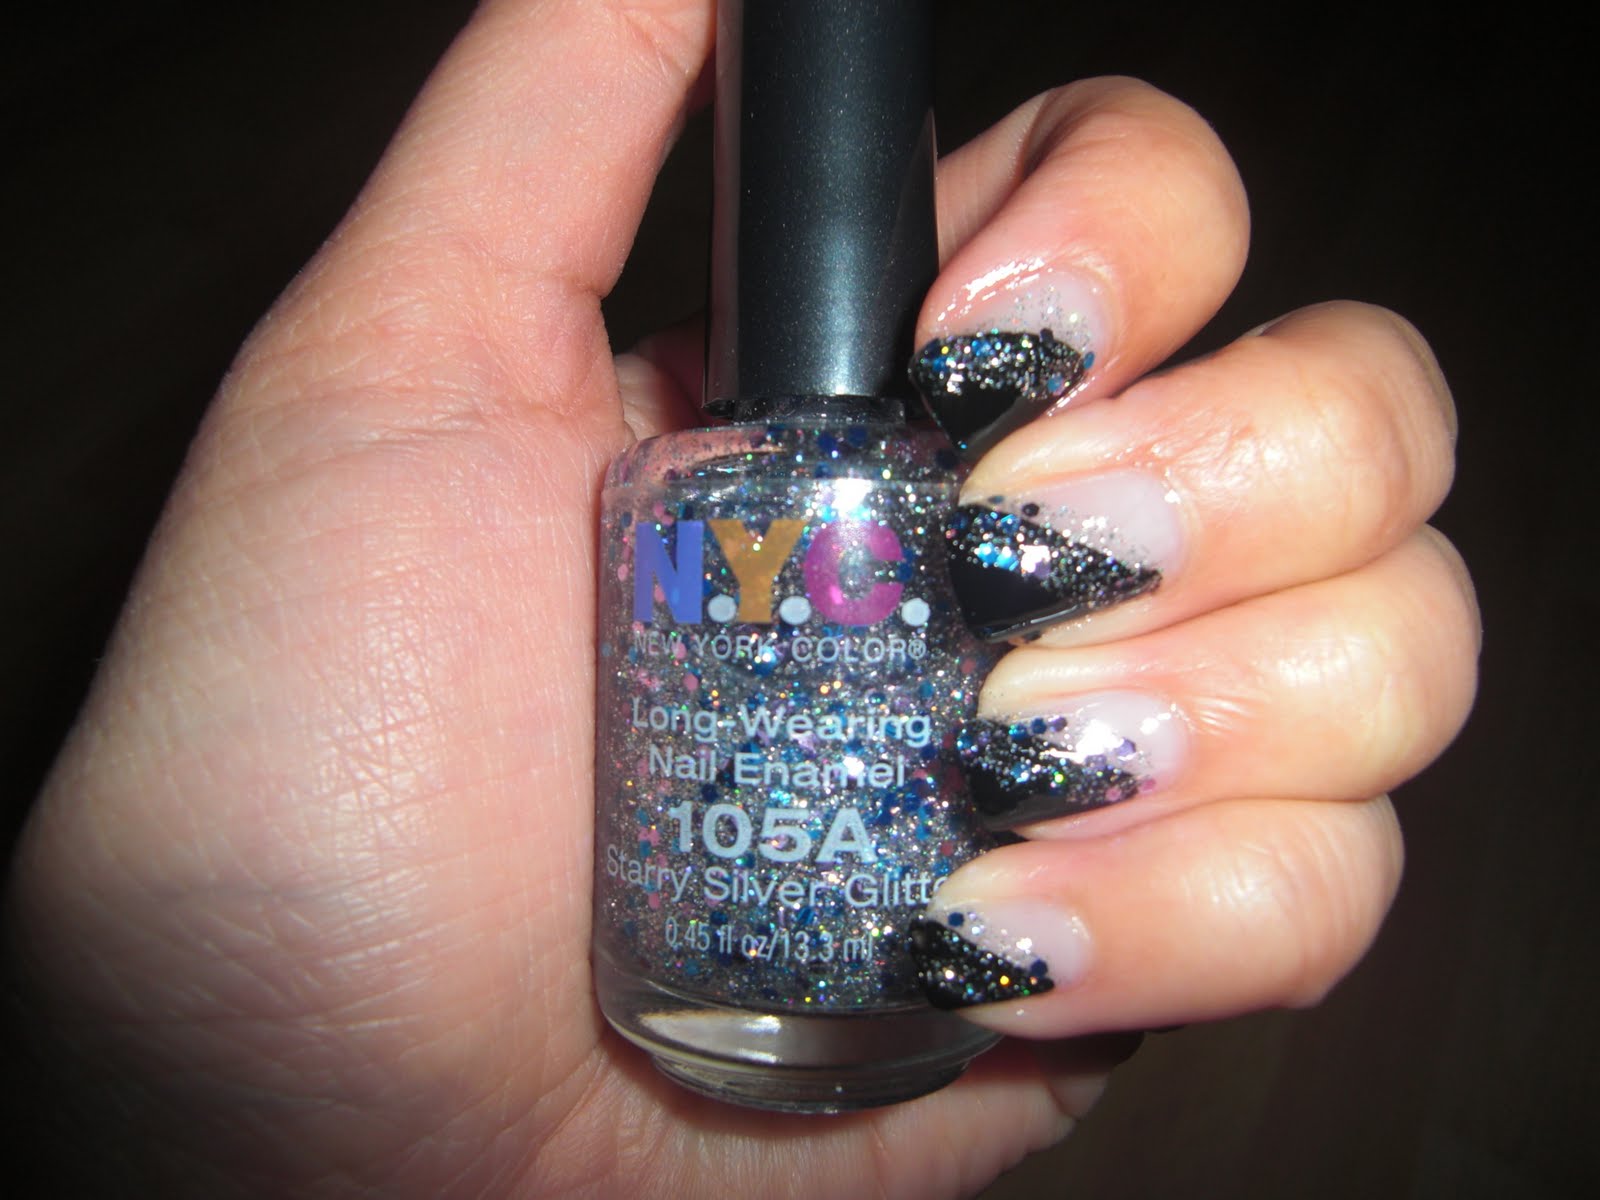
What I used:
- Milani Nail Art (with precision brush) in Black Sketch - Nailene French Manicure (base color polish and acrylic strong top coat)
- N.Y.C 105A Starry Silver GlitterTook the mani from January 11, 2011, and instead just the tips I did diagonal tips (I should really think of a name to call these kind of tips).


Tuesday, April 12, 2011
Where Are You?!
Yeah I know I haven't updated. I'm going through some crazy stuff with school right now (not doing to well if I must say) so I haven't posted up anything since Feb. I have every single NOTW saved on my computer and will find time to update when I can.
This is just an update on what I've been up to lately.
* Besides school, I went to Lake Tahoe with my family (our annual trip) and got to enjoy the snow before spring weathers hit the area. Our new cabin that we rented was crazy huge and we got the whole backyard to play in for ourselves. And when I mean backyard, I mean the woods.. it was THAT large. Large enough for some of my family to go snowboarding in! We had to make our own trails since the snow was way too fresh, about 2-3 feet of new snow.. we came crashing down as soon as you stepped in. I would like to add that my nails matched the occasion of snow, though I wasn't able to take a picture of it since I wasn't satisfied with the way they looked.
*It's baseball season, which means it's another year of going fan crazy like I always do. Already started the season with some autographs from A's tailgate fanfest and also got to enjoy Japanese Heritage day at the ballpark (btw, I'm not Japanese, I'm just stating it was Japanese heritage haha). With the recent events in Japan, it was a great day to celebrate heritage day with everyone, especially with all the "Ganbare, Nippon!" signs around the stadium. Fashionably appropriate, I was wearing a Kurt Suzuki jersey shirt, A's jacket, Green/Yellow Converses and was able to get a Hideki Matsui player shirt as a promotional giveaway.
*I'm excited for SF Japantown Cherry Blossom Festival. I haven't been to the event in 2 or 3 years, so there's a lot of things I want to see (and eat!). I'll update with pictures from the festival, probably on my personal blog.. which I should be writing ALL THIS at. In the spirit of the festival, I'll be painting my nails with Cherry Blossoms and after the week I'll be painting them to match Spring as soon as I get more colors.
Speaking of which, ULTA is having a great deal on some brand polishes this month. Check it out if you have an Ulta around or check out their website.
That should be it for now. I'll hopefully put up pictures sometime after this weekend, but I have a midterm to study for on Thursday. Ochem... FML -_-*
Subscribe to:
Posts (Atom)